By Victor Rao MBBS, DMRD, RDMS – Abdomen, Ob/Gyn (APCA)
Introduction
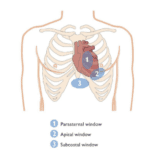
The parasternal long axis (PLAX) view of the heart is a relatively easy view of the heart to obtain in an average patient using a low frequency phased array ultrasound transducer. This type of transducer was designed specifically for echocardiography because the cardiac acoustic windows are typically intercostal spaces except for the subxiphoid or subcostal views. The cardiac transducer footprint is small to allow placement in the intercostal space region. Some experts can manipulate a low frequency curvilinear transducer with a large footprint to get quite good views of the heart as well. However, that should be reserved for a situation when a phased array transducer is not available or just for the subcostal view of the heart. The figure below shows the typical intercostal spaces that must be scanned to look for the best PLAX view of the heart.
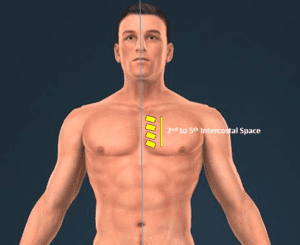
Figure 1. Scan along the left parasternal region just close to the edge of the sternum starting from the 2nd all the way to the 5th intercostal space. The yellow regions indicate intercostal spaces mentioned above. On average the best PLAX views are obtained in the 3rd or 4th intercostal space. Two or more intercostal spaces will yield the PLAX view but only one will give you the best possible PLAX view in a patient.
Patient Position
It is highly recommended to obtain the PLAX view with the patient in the left lateral decubitus position when possible. If the patient is in distress the above recommended position may not be easy to achieve and in those cases, we can scan the patient in the supine position if we are able to obtain an optimal PLAX view. There are some instances where we can obtain a perfect PLAX view with the patient in the supine position. However, even in those cases the image quality improved by scanning the patient in the left lateral decubitus position.
Here are some possible explanations as to why the image quality improves. When the patient rolls over to the left lateral decubitus position:
- The heart moves slightly closer to the chest wall.
- The aerated lung is displaced slightly laterally, providing a slightly larger acoustic window.
- The patient is asked to place the left hand under the head by flexing the arm and elbow. This opens the intercostal space slightly more to provide a larger acoustic window.
Collectively, the above mechanisms help acquire a clearer view of the heart. If it is still not adequate you may ask the patient to exhale and stop breathing for 10-20 seconds as you quickly capture a clear view of the heart. This technique is very helpful in patients with chronic obstructive pulmonary disease (COPD).
Technique
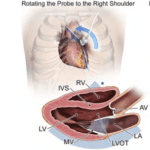
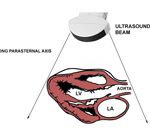
Scan with the patient in the left lateral decubitus position. Apply acoustic coupling gel along the left parasternal region as shown in figure 1. Place the transducer footprint over the region of the second intercostal space with the transducer orientation marker pointing towards the patient’s right shoulder. Slide the transducer caudally and observe the monitor. The PLAX view will appear approximately in the third and fourth intercostal space. Select the intercostal space that provides the clearest PLAX view. If the apex of the heart is visible, slide the transducer towards the right shoulder by 1-2 mm along the long axis of the heart, which is an imaginary plane from the right shoulder to the left hypochondrium. If the mid left ventricle is not visible, slide the transducer towards the apex by 1-2 mm. Rotate the transducer gently clockwise and then counterclockwise to open the left ventricle. See table below.
| Anatomical Structure | Should Be Seen | Should Not Be Seen |
| Left Atrium (LA) | Yes | |
| Left Ventricle (LV) base and mid ventricle | Yes | |
| Left Ventricle (Apex) | No | |
| Mitral Valve (MV) – Anterior & Posterior MV leaflets | Yes | |
| Aortic Valve (AV) | Yes | |
| Right Ventricle Outflow Tract (RVOT) | Yes | |
| Posterior Wall of Left Ventricle (PWLV) | Yes | |
| Pericardium adjacent to PWLV | Yes | |
| Descending Thoracic Aorta | Yes | |
| Ascending Aorta (proximal) and Aortic Root | Yes | |
| Tricuspid Valve (TV) | No | |
| Right atrium (RA) | No |
Table 1. List of structures that should be seen in a PLAX view and structures that should not be seen.
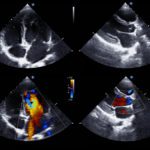
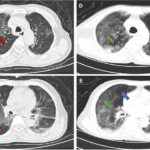
Start with a depth setting of 15-18 cm. Identify the descending thoracic aorta and look for evidence of fluid such as a pericardial effusion or a pleural effusion and if seen observe the relationship of the fluid to the descending thoracic aorta. If the fluid is wedged in between the descending thoracic aorta and the left atrium it is consistent with a pericardial effusion. If the fluid is seen instead tracking posterior to the descending thoracic aorta, then it is a pleural effusion. At times you may encounter a patient with both a pericardial effusion and a pleural effusion.
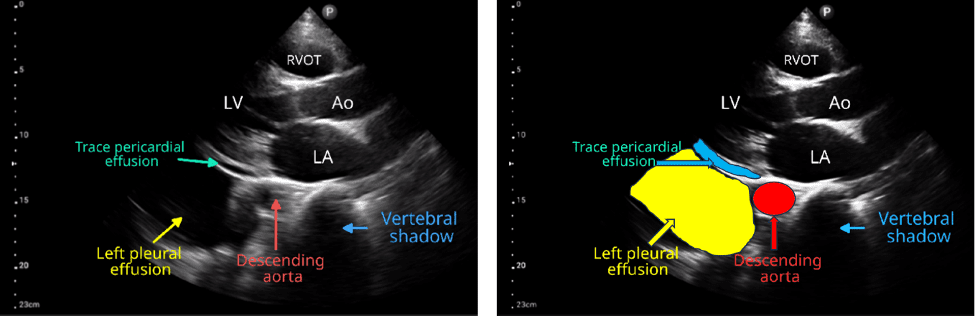
Figure 2. PLAX view showing a small pericardial effusion and a large pleural effusion. Observe the location of the descending thoracic aorta/descending aorta. Image courtesy of NephroPOCUS.
If there is evidence of a pericardial or a pleural effusion, adjust depth to include the entire effusion and a 2-3 cm zone beyond the effusion. If there is no evidence of pleural or pericardial effusion, adjust the depth to include 1 cm beyond the posterior wall of the descending thoracic aorta.
Conclusion
The PLAX view is an easy cardiac view to learn. To obtain the best image quality it is recommended to scan the patient in the left lateral decubitus position. The recommended position may not be possible for some patients. Adjust depth and gain for optimal image quality. Reduce the gain if the blood in the heart chambers appears hyperechoic. Unclotted blood should appear anechoic. It is important to master this cardiac view to be able to do evaluation of the heart in a POCUS setting. It could be considered the second most important view of the heart after the apical four chamber view (A4C) of the heart, which is a more challenging view to obtain but is also very much doable once you understand the basics.