By Victor V Rao MBBS, DMRD, RDMS
The B-mode compression test is considered the gold standard which allows assessment of the deep veins in the extremities for possible thrombus. While the full DVT assessment protocol performed in a vascular lab has sensitivity of 94% and specificity of 97.3% it consumes a lot of time (30-45 minutes) and busy clinicians may not have the time or the necessary experience to perform a full DVT assessment protocol.
Compression test performed by a general practitioner using the POCUS protocol has a sensitivity of 90% and a specificity of 97.1% and could be performed in approximately 5 minutes. Serial ultrasound compression test increases the sensitivity to 97.9%. The POCUS protocol also recommends performing D-dimer test as well in addition to the compression test. Even though D-dimer is highly sensitive, it does have a low specificity. D-dimer could be elevated due to pregnancy, strenuous activity, infections, cancer, trauma, impaired renal function, smoking, old age and some inflammatory disorders such as rheumatoid arthritis. If the D-dimer turns out to be very low, then the suspicion of index for the possibility of a DVT is low and paired with a negative 2 or 3 zone compression test we can feel quite confident we are not dealing with an acute DVT. Repeating these after a week with similar results essentially rules out a DVT.
The original Point-of-care Ultrasound DVT protocol proposed consisted of compressing the two key areas of the lower extremity in each lower limb at the level of the saphenofemoral junction (common femoral vein and greater saphenous vein) and the popliteal vein at the level of the popliteal crease. The above-mentioned compression test only checks for a thrombus at those two levels, and you could miss a thrombus if present above or below that level. Be aware that the ultrasound image slice is only 1 mm thick. To avoid missing a thrombus some experts have recommended a two-zone approach. In this approach you scan in 1 cm increments above and below the proposed zones to cover a 4-5 cm zone.
Some experts also use a 3-zone approach by scanning the mid-thigh region (femoral vein). In my experience, I have noticed that most clinicians are able to perform the compression test accurately at the level of the popliteal crease. However, many struggle to do a perfect compression test at the saphenofemoral junction (Mickey Mouse Sign) region. The reason is that you need to apply much more pressure with the transducer at the saphenofemoral junction region. You can place your hand on the posterior aspect of the thigh and push anteriorly when applying the pressure with the transducer to provide adequate counter traction to assist in proper compression test.
Technique
Patient Position
For the saphenofemoral region, a semi-sitting position or a reverse Trendelenburg position is recommended. That will help pool the blood in the venous system for easy visualization. For the popliteal region, the patient could be in a prone position or seated upright at the edge of the bed or even a supine semi-upright position with the knee flexed up to 30 degrees (in this position be sure to provide counter traction on the knee when performing the compression test).
Transducer Choice
A linear transducer or a multifrequency transducer with a frequency range of 5-10 MHz is frequently used. For an obese patient or if the deep vein is located deeper than 4-5 cm, you will have to select a low frequency curvilinear transducer because the high frequency linear transducer may not be able to image the deep veins and could be considered out of range.
Three Zones for Compression Test
The three zones for performing a compression test using the POCUS protocol would be:
- Saphenofemoral junction region (common femoral vein with greater saphenous vein draining into it)
- Popliteal crease region (popliteal vein)
- Mid-thigh (femoral vein – only for the 3-zone compression)
Compression Test Technique
It is very important to understand the concept and apply adequate pressure to collapse the deep vein. The anterior and posterior walls of the vein must touch with no residual anechoic lumen. The compression test can be described as a two-step process.
Step 1
Locate and identify the deep vein being examined using B-mode ultrasound. Obtain a transverse view of the deep vein and then slide the transducer to position the image of the deep vein in the middle of the ultrasound monitor.
Step 2
Observe for any obvious thrombus or a floating thrombus in the lumen of the deep vein. Be aware that an anechoic thrombus will not be visible on ultrasound. Compress the deep vein with the transducer perpendicular to the vessel wall. Perform the compression test only in the transverse view. Do not perform the compression test in the longitudinal view as the vein may slip out of the view giving a false impression.
If the vein collapses or compresses completely with pressure, it indicates that the vein is patent, and no thrombus is present within the lumen of the vein at that level. However, if the vein does not compress completely, or if it is not compressible at all, it suggests the presence of a blood clot/thrombus within the lumen of the vein. Be aware the user can apply inadequate pressure and that may result in a false positive test.
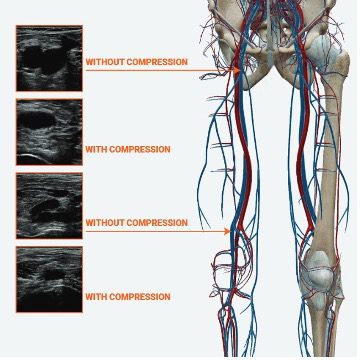
Figure 1. Compression tests ultrasound images with and without compression at the saphenofemoral junction and the popliteal crease region. Observe that the veins are fully collapsed during the compression test. This demonstrates a normal 2-zone compression test.
Let us look at some more examples below.
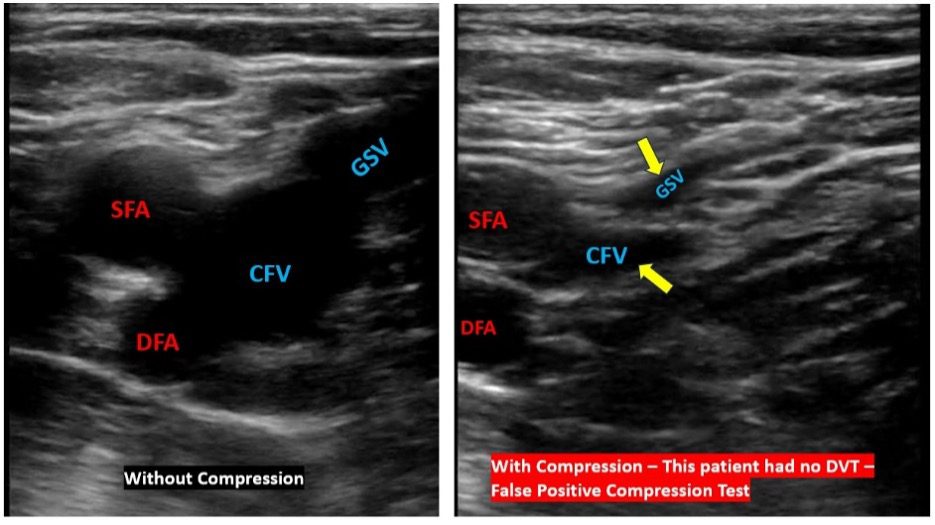
Figure 2. Image on the left shows the vessels at the saphenofemoral junction without compression. Observe location of the common femoral vein (CFV) and the greater saphenous vein. The greater saphenous vein is a superficial vein but is also considered for the compression test because if a thrombus is present in it (in its proximal segment), the thrombus will grow and extend into the CFV and cause a DVT. The image on the right shows partial compression of the veins. Note that the CFV and GSV anechoic lumens are still visible, and the veins are not completely collapsed. This was a false positive test. Some folks mistakenly call this as no DVT because the veins were partially compressible. To qualify for that the veins not having a thrombus (normal – no DVT) they must collapse completely with no anechoic lumen visible. Most folks get this wrong. Please be careful when performing a compression test. Clinical Impression: Either false positive DVT suspicion due to improper technique or small clots present in CFV and GSV. Do not call it – “no DVT present!”
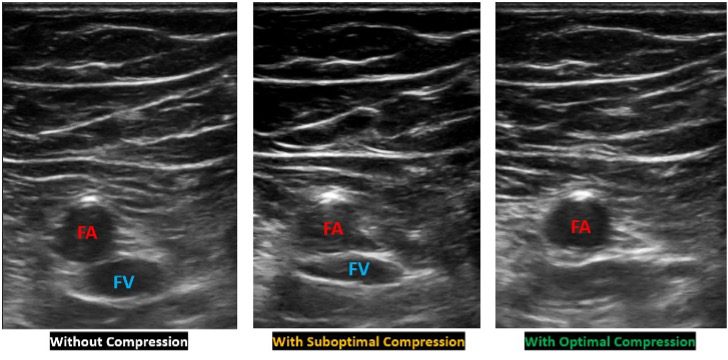
Figure 3. The image on the left shows femoral artery (FA) and femoral vein (FV) without compression in the mid-thigh region. Middle image shows inadequate compression and the image on the right shows fully compressible FV. The anechoic lumen of the FV is no longer visible. Clinical Impression: No DVT in the FV at that level.
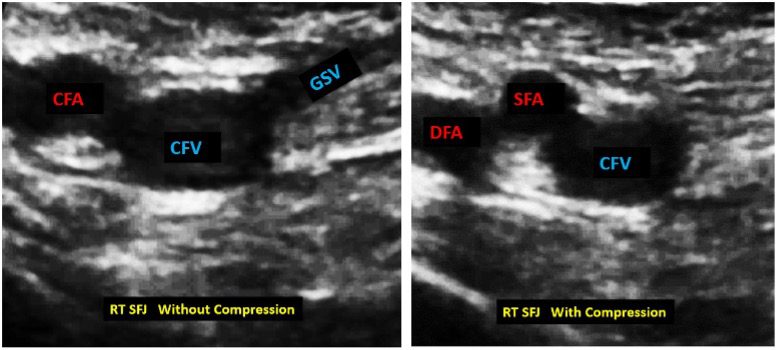
Figure 4. The image on the left shows the Mickey Mouse sign before the compression test. Note the location of the common femoral artery (CFA), common femoral vein (CFV) and the greater saphenous vein (GSV). The image on the right shows the CFV still seen with an anechoic lumen. The GSV has collapsed completely. This is consistent with a DVT in the CFV at that level. The thrombus is not visible because in this case the thrombus is anechoic. Clinical impression: DVT – thrombus/clot in CFV.
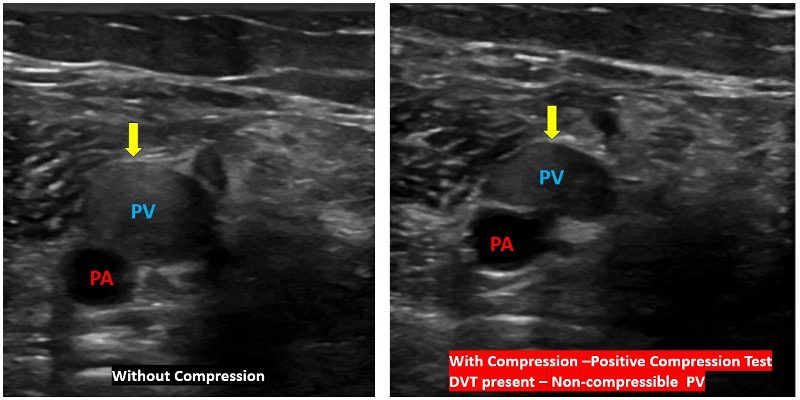
Figure 5. Image on the left shows dilated popliteal vein with predominantly echogenic content. Image on the right with compression test shows slight compression of the popliteal vein. The PV is not fully compressible. Clinical Impression: Non compressible popliteal vein – DVT in popliteal vein.
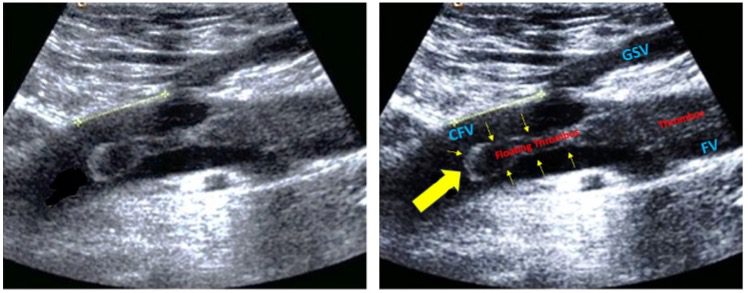
Figure 6. The image on the left shows deep vein thrombosis of the femoral vein (FV), with floating thrombus (large yellow arrow and small yellow arrows in the image on the right) arising from it and extending into the common femoral vein (CFV). The thrombus is clearly visible, and it would be safer to not compress the floating thrombus as it can break off easily and result in a pulmonary embolism (PE). A safer location to do the compression test would be over the femoral vein region where the echogenic thrombus seems to be filling the entire lumen of the femoral vein. If you do wish to perform the compression test over the region of the floating thrombus, compress gently with great caution. Image courtesy ResearchGate.
A question often asked is whether it is necessary to do the compression test. The answer is “Yes”. The image below will help you understand why.
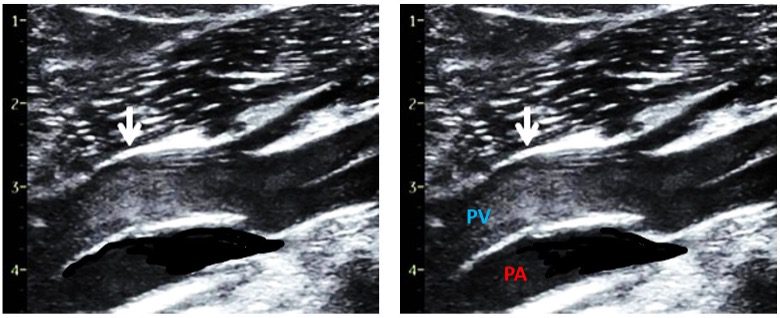
Figure 7. Both are identical images. The images show spontaneous echogenic contrast due to very slow flow in the popliteal vein (PV). Observe, the normal popliteal artery immediately posterior to the PV. The lumen in the popliteal artery appears anechoic (black). Even though the PV lumen appearance raises the suspicion of a thrombus, the vein was fully compressible. Keep in mind that slow moving blood may appear echogenic and should not be confused with a clot. Image courtesy ResearchGate.
Conclusion
The compression test is a great tool to assess deep veins for DVT and remains the gold standard using ultrasound. Care must be taken to document full compression of the deep vein, or the vein being examined. The anterior and posterior walls of the vein must touch each other with no residual anechoic lumen. My hope is that clinicians using this tool will learn to use it correctly and document properly with labels for future follow up studies.